Finding, filtering, updating, and staying on top of your lead data inside LeadVix
What Is This Guide For?
Once your leads are imported, the real work begins. This guide shows you how to navigate your CRM, find specific leads, filter by industry, view and edit lead profiles, assign leads to team members, and move leads through your pipeline stages.
Think of this guide as your day-to-day reference for working inside the LeadVix CRM.
Getting to Your CRM
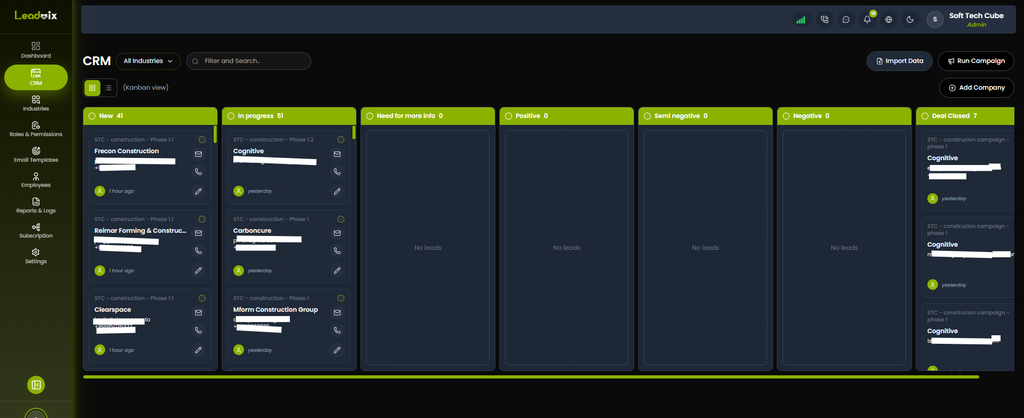
Click CRM in the left sidebar. This is where all your imported leads live, organised, searchable, and ready to work with.
At a glance, you’ll see:
- A list of all your leads
- Their name, company, email, industry, and current pipeline stage
- Any leads that have been assigned to specific team members
- The status of recent activity on each lead
Finding a Specific Lead
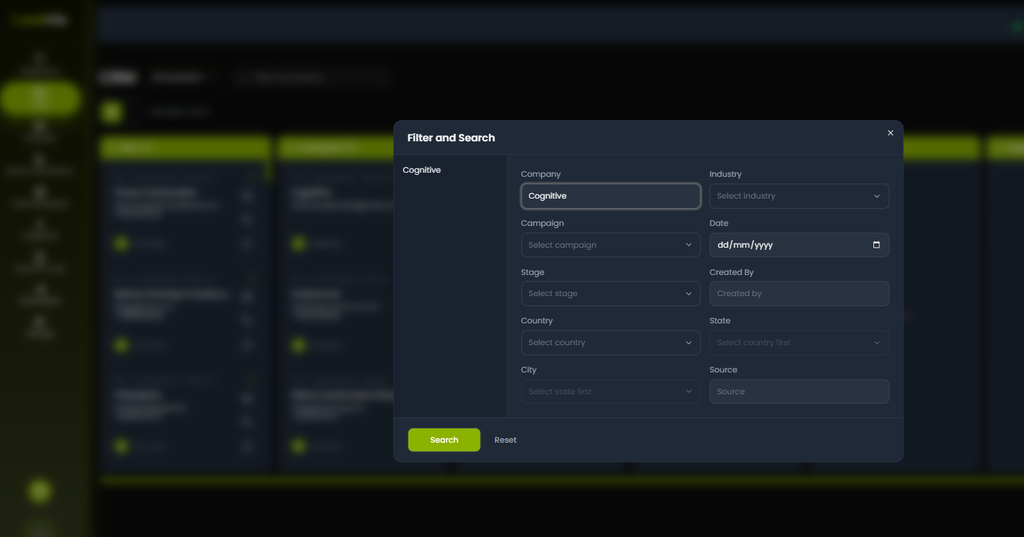
If you’re looking for a particular lead, use the Search function at the top of the CRM. You can search by:
- Lead name
- Email address
- Company name
Type what you’re looking for and the CRM will filter results instantly.
💡Tip: If you’re not finding a lead you’re sure you imported, double check the import report from Guide 5. The lead may have been flagged as a duplicate or failed to import due to a missing required field.
Filtering Leads by Industry
One of the most important things to understand about LeadVix is that campaigns are always run by industry. This means keeping your leads organised by industry isn’t just good housekeeping; it’s essential for running campaigns effectively.
To filter leads by industry:
- Look for the Industry filter option in the CRM
- Select the industry you want to view
- The CRM will show only leads belonging to that industry
This is especially useful when you want to check how many leads you have in a specific category before running a campaign for that industry.
💡Tip: If you notice leads sitting in the wrong industry after importing, fix this now before running campaigns. Leads that are miscategorised will either be missed by campaigns or included in the wrong ones.
Viewing a Lead Profile
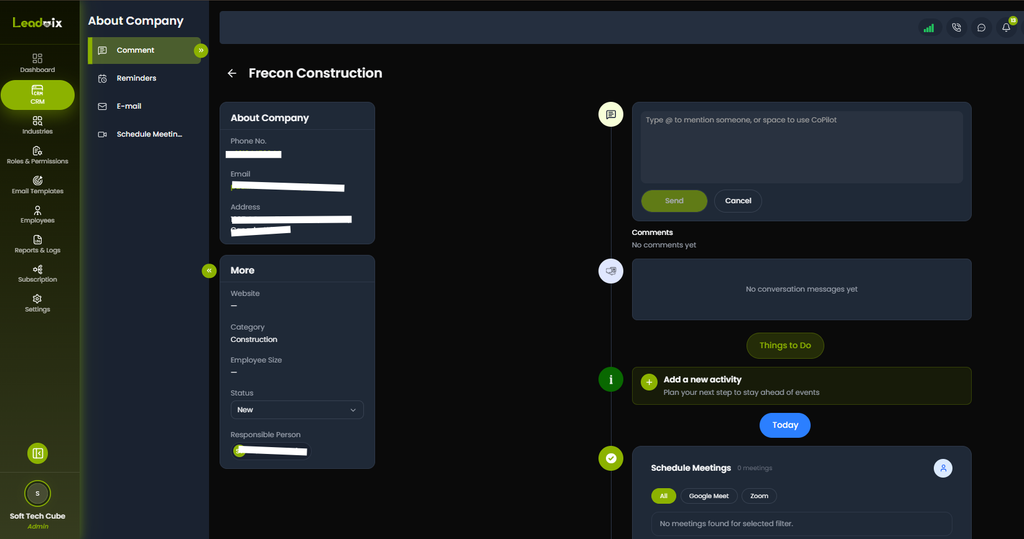
Click on any lead’s name to open their full profile. Inside a lead profile you’ll find:
- Contact details — name, email, phone, company, website
- Industry and category
- Current pipeline stage
- Conversation history — all emails sent and received with this lead
- Notes — any internal notes added by you or your team
- Activity log — a timeline of everything that’s happened with this lead
- Assigned team member — who on your team is responsible for this lead
Editing a Lead’s Details
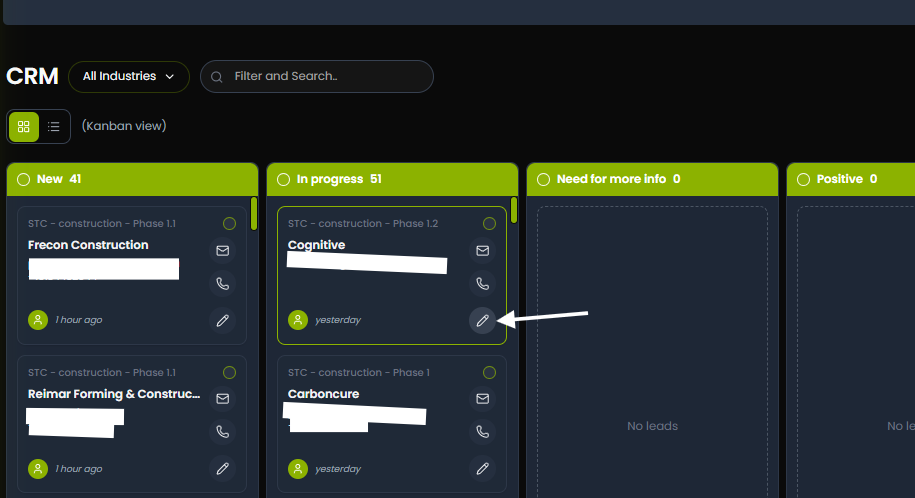
If any details need updating after import, such as a corrected email address, a new phone number, or a changed company name, you can edit them directly inside the lead profile.
- In CRM, click the Edit option on the lead you want to change
- Make your changes
- Save
Changes take effect immediately.
💡Tip: Keep lead details accurate and up to date. The AI uses lead information, including company name and contact name, when drafting personalised emails. Outdated or incorrect details will result in emails that feel off or unprofessional.
Moving Leads Through Pipeline Stages
Your pipeline shows where every lead is in your process. As you make progress with a lead they reply positively, you have a call, they request a proposal you move them forward through the stages.
To move a lead to a different stage:
- Open the lead profile
- Find the Status field
- Select the new status from the dropdown
- Save
Or if you’re using the Kanban view, simply drag and drop the lead card from one column to the next.
Typical pipeline stages:
| Stage | What It Means |
| New | Lead just imported — campaign not yet run |
| In Progress | Campaign is running — emails sent and being tracked |
| Need for More Info | Lead has replied asking for more details |
| Positive | Lead has responded with interest |
| Semi Negative | Lead showed some hesitation or partial interest |
| Negative | Lead is not interested |
| Deal Closed | Deal successfully completed |
💡Tip: Move leads through stages as things happen; don’t let your pipeline sit stale. A pipeline that accurately reflects reality is one of the most useful tools you have for understanding where your business stands at any given moment.
Assigning Leads to Team Members
If you’re working with a team, you can assign specific leads to specific people. This makes it clear who is responsible for following up and prevents two people from accidentally reaching out to the same lead at the same time.
To assign a lead:
- Open the lead profile
- Find the Responsible Person field in the lead profile under the More section
- Click on it and select the team member you want to assign this lead to
- Save
The assigned team member will be able to see and work on that lead from their own account, depending on the permissions set by the Admin.
💡Tip: Make lead assignment a habit from day one, especially in teams of 3 or more. Unassigned leads have a way of falling through the cracks when everyone assumes someone else is handling them.
Adding Comments to a Lead
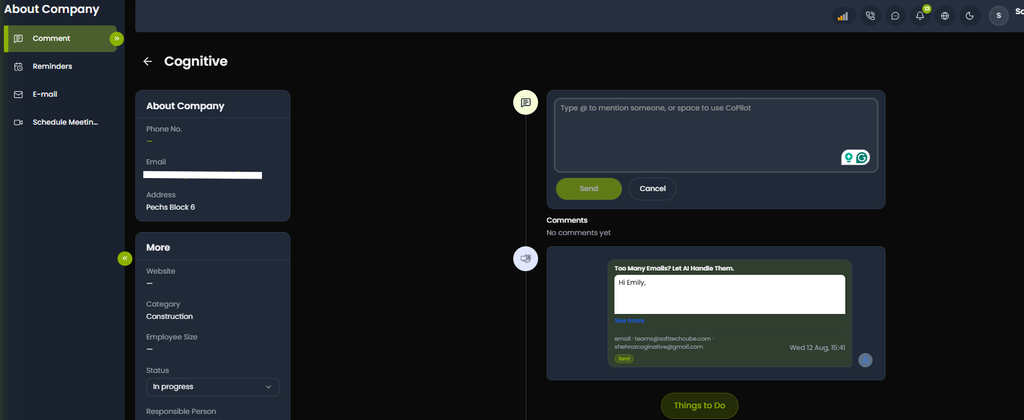
The Comment tab in the left sidebar of a lead profile is where you leave internal notes and updates about that lead.
- Open the lead profile
- Click the Comment tab in the left sidebar
- Type @ to mention a specific team member or press space to use CoPilot
- Write your comment
- Click Send
Comments are visible to all team members who have access to that lead and appear in the main timeline.
💡Tip: Make comments specific and useful. “Called and left voicemail” is not enough. “Called 12 Aug not available, left voicemail about the Construction campaign. Will follow up Friday” gives your team real context and saves everyone time.
Setting Reminders
The Reminders tab lets you set a follow-up reminder for any lead so nothing slips through.
- Open the lead profile
- Click the Reminders tab
- Set a date and time for your reminder
- Add a note about what the reminder is for
- Save
LeadVix will notify you when the reminder is due.
💡Tip: Set a reminder any time a lead says “call me back next week” or “check in with me in a month.” Don’t rely on memory or a separate calendar; keep it all inside the platform where your team can see it too.
Scheduling a Meeting
The Schedule Meeting tab lets you book a Google Meet or Zoom call directly from within the lead profile.
- Open the lead profile
- Click the Schedule Meeting tab
- Choose Google Meet or Zoom
- Set the date and time
- Send the invite
The meeting gets logged in the lead’s timeline automatically.
Adding a New Activity
The Add a new activity button in the lead timeline lets you log any interaction with a lead: a call, a site visit, a proposal sent, or any other touchpoint.
Click Add a new activity and fill in what happened and when. This keeps a complete record of everything that’s taken place with that lead, visible to your whole team.
Viewing Lead Status History
At the bottom of the lead timeline, Lead Status History shows a complete automatic log of every status change for that lead, including who made the change and when.
For example:
New → In progress — Wed 12 Aug, 15:41 — Status changed from new to in progress by a system
This means you always have a clear audit trail of how a lead has progressed even if multiple team members have been involved.
Deleting a Lead
If a lead needs to be removed because they’ve opted out, the data is wrong, or they’re no longer relevant:
- Go to CRM
- Click the circle/checkbox on the lead card to select it
- A toolbar appears at the top showing “Selected: 1”
- Click Delete in the toolbar
- Confirm deletion
💡Tip: You can select multiple leads at once and delete them all in one go using the same toolbar.
Running Into a Problem? Here’s What to Do
Can’t find a lead after importing
Use the search bar to look them up by email address. If they still don’t appear, check the import report to confirm they were in the Valid Records count. If not, they may need to be re-imported.
Lead is in the wrong industry
Open the lead profile, edit the Category field in the More section, and save. Fix miscategorised leads before running campaigns industry determines which leads get included in which campaign.
Status not updating
The Status dropdown in LeadVix saves automatically when you select a new stage. If it doesn’t seem to be updating, refresh the page and try again.
Comment not sending
Check your internet connection and try again. Make sure you’ve typed something in the comment box before clicking Send.
Responsible Person field not showing team members
Make sure your team members have been added and activated in the Employees section first. Only active team members appear in the Responsible Person dropdown.
Frequently Asked Questions (FAQs)
What is the difference between a Comment and an Activity?
Comments are internal notes your team leaves for each other about a lead. Activities are logged interactions with the lead: calls, meetings, proposals. Both appear in the lead timeline but serve different purposes.
Can I move a lead back to an earlier pipeline stage?
Yes. The Status dropdown lets you move a lead to any stage in any direction; there’s no restriction on moving backwards.
What does Lead Status History show?
It shows an automatic timestamped log of every status change for that lead, including who changed it and when. It’s a complete audit trail of how the lead has progressed through your pipeline.
Can I schedule meetings directly from the lead profile?
Yes. The Schedule Meeting tab lets you book a Google Meet or Zoom call directly from within the lead profile. The meeting gets logged in the timeline automatically.
What happens to a lead’s history if I change their Responsible Person?
The history stays intact. Changing the Responsible Person only affects who is assigned going forward; all previous comments, emails, and status changes remain in the timeline