Taking your leads and templates and turning them into real outreach
What Is This Guide For?
You’ve connected SendGrid, set up IMAP, configured your General Settings, imported your leads, and created your email template. Now it’s time to put it all together and run your first campaign.
This guide walks you through every step from selecting your industry and leads, to launching the campaign and understanding what happens next.
Before You Run a Campaign, Quick Checklist
Make sure these are all in place before starting:
✅ SendGrid connected and tested
✅ IMAP configured and saved
✅ General Settings complete with Knowledge Base uploaded
✅ Leads imported and organised by industry
✅ At least one active email template created
If any of these aren’t done yet, go back to the relevant guide first. A campaign won’t run properly without all five in place.
How to Get There
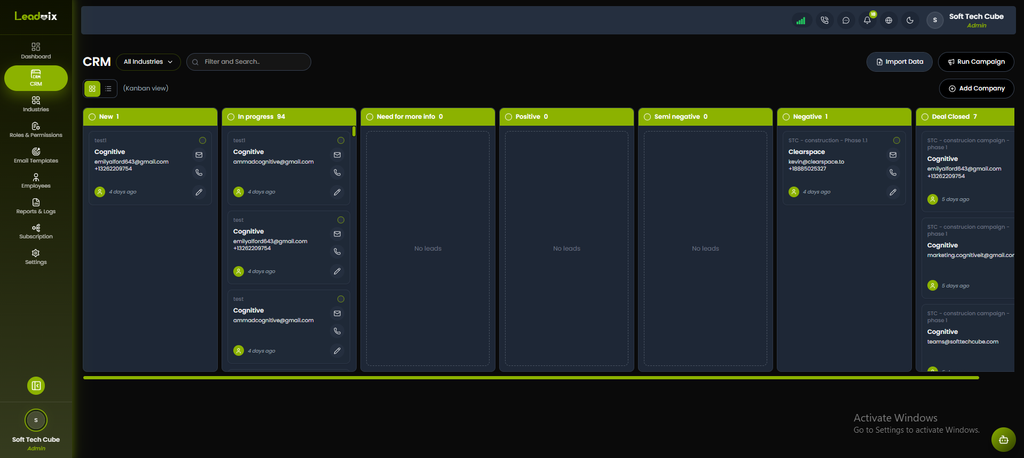
Click CRM in the left sidebar. This is where you’ll find your leads organised in the Kanban view and where you’ll start your campaign from.
Step 1: Select Your Industry
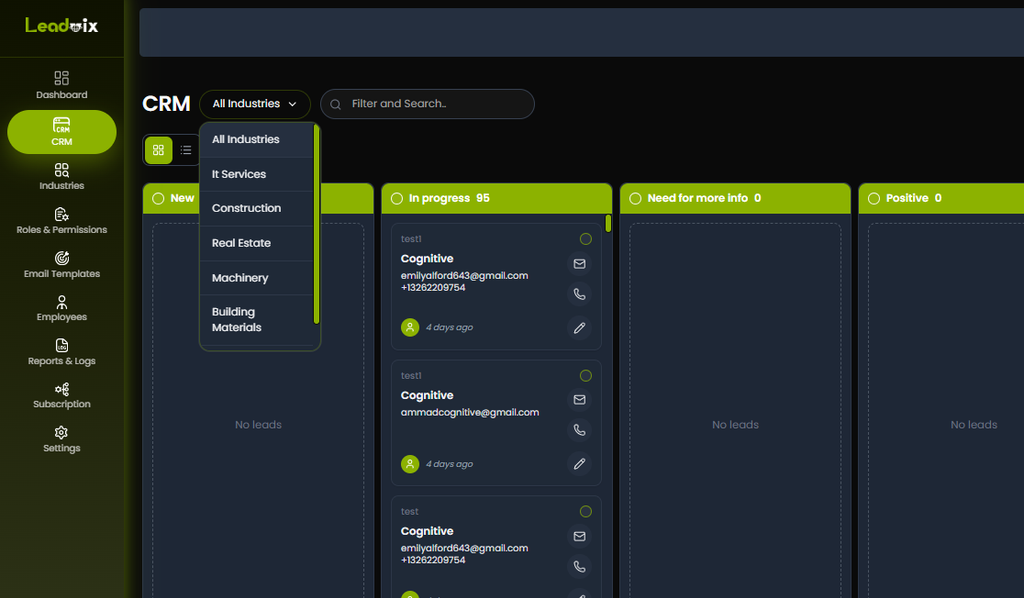
Campaigns in LeadVix are always run by industry. Before selecting any leads, you need to filter down to the industry you want to target.
At the top of the CRM, you’ll see an “All Industries” dropdown. Click it and select the industry you want to run a campaign for.
The CRM will filter to show only leads in that industry.
💡 Tip: Always run campaigns industry by industry. Mixing industries in one campaign means your email template, which is written for a specific sector, will feel generic or off to leads in other industries. One industry, one campaign, one template.
Step 2: Select Your Leads
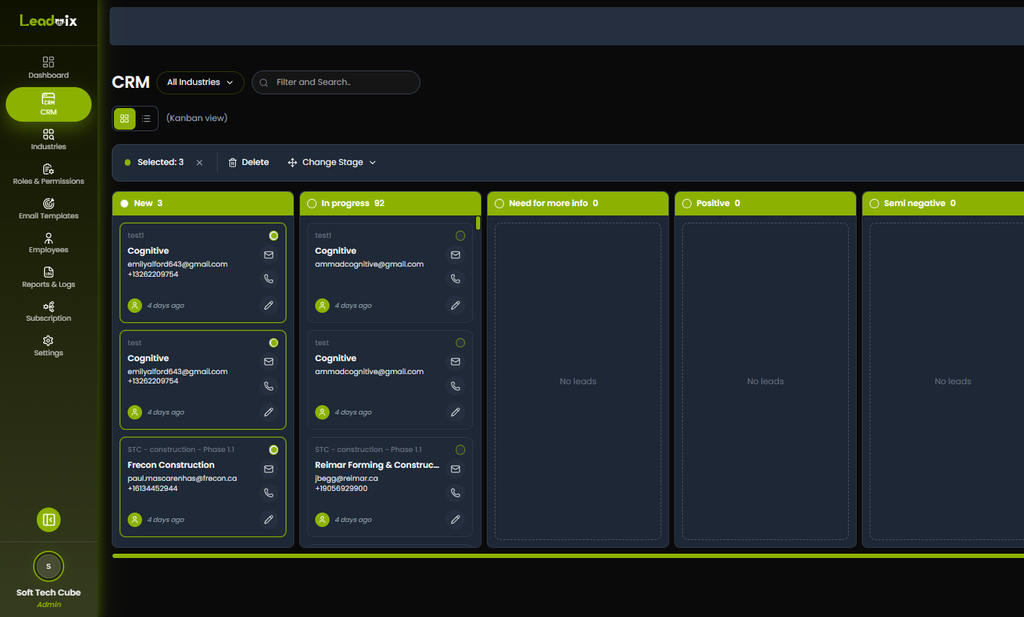
Now select the specific leads you want to include in this campaign. Click the circle/checkbox on each lead card you want to include. As you select leads, a toolbar appears at the top of the CRM showing how many leads are selected.
💡Tip: For your first campaign, start small; select 5 to 10 leads rather than your entire list. This lets you test your template and settings before rolling out to hundreds of leads at once. If something needs adjusting, it’s much easier to fix on a small batch.
💡Tip: Only select leads in the New stage for a fresh campaign. Leads already in In Progress or beyond are already being worked on; adding them to a new campaign could result in duplicate outreach.
Step 3: Click Run Campaign
Once your leads are selected, look for the “Run Campaign” button in the toolbar that appeared when you made your selections. Click Run Campaign.
Step 4: Choose New or Existing Campaign
Two tabs appear at the top:
- New Campaign: Starting a fresh campaign
- Existing Campaign: Adding selected leads to a campaign you’ve already created
Step 5: Filter Your Leads
Use the filters to narrow down which leads to include:
| Filter | Details |
| Country | Select your target country |
| State | Select state — requires country selected first |
| City | Select city — requires state selected first |
| Industry | Required — must select to proceed. Red warning shows if skipped |
| Employee Size | Optional — filter by company size |
| Designation | Optional — filter by job title |
Click Filter Data to load matching leads.
Step 6: Select Leads From the Table
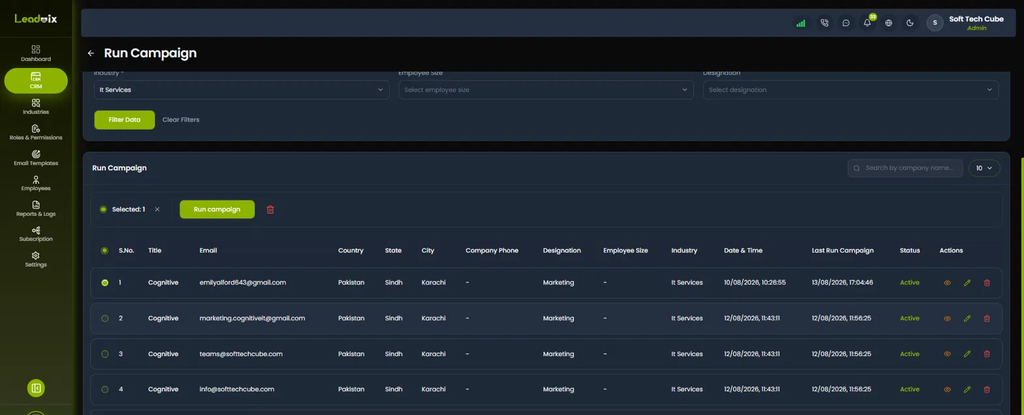
After clicking Filter Data, a lead table appears showing all matching leads with these columns:
Select the leads you want to include by clicking the circle checkbox on the left of each row. You can also:
- Search by company name using the search bar at the top right
- Control how many leads show per page using the 10/page dropdown
- View, edit, or delete individual leads using the action icons on the right
💡Tip: Check the Last Run Campaign column before selecting; if a lead was recently included in another campaign, you may want to skip them to avoid sending too many emails to the same contact.
💡Tip: The Status column shows Active leads; these are ready to be included in your campaign.
Step 7: Click Run Campaign
- Click the green Run Campaign button in the toolbar.
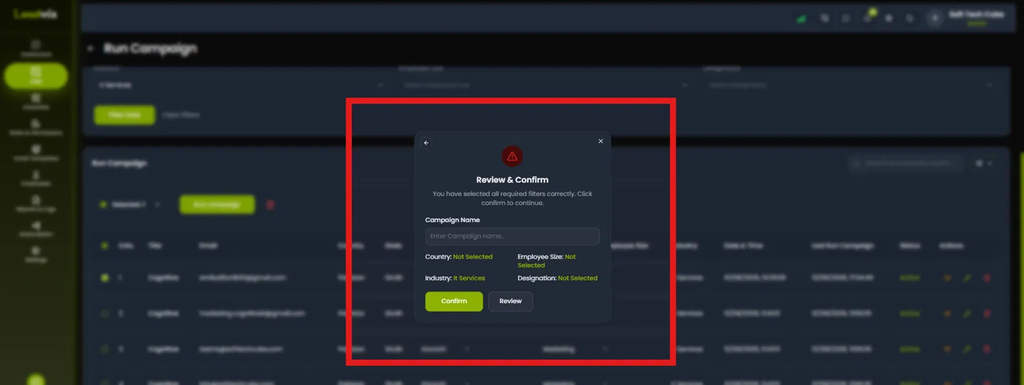
- A Review & Confirm popup appears showing your filter summary and a Campaign Name field. Enter your campaign name and click Confirm to launch.
- The system confirms Campaign Created Successfully. Emails begin sending within minutes.
- Track progress from the CRM Kanban view, Dashboard, or Reports & Logs.
What Happens After the Campaign Launches?
Once your campaign is running, here’s what LeadVix does automatically:
Emails go out
LeadVix sends your template email to every selected lead through your connected SendGrid account. Each email is personalised; variables such as {{first_name}} and {{company_name}} are replaced with each lead’s actual data.
Lead statuses update
As emails are sent, selected leads automatically move from New to In Progress in your pipeline; you’ll see this reflected in the Kanban view.
Replies come in
As leads reply, LeadVix pulls those replies via your IMAP connection and displays them on each lead’s profile timeline.
AI classifies every reply
AI classifies every reply and updates the lead’s Stage automatically:
| Stage Updated To | What Happens Next |
| Positive | AI drafts a follow-up response to keep the conversation moving |
| Semi negative | AI waits the delay hours set in General Settings (default 72 hours) then drafts a follow-up |
| Need for more info | AI drafts a detailed reply pulling from your Knowledge Base |
| Negative | No follow-up sent — conversation stops here |
| In progress | AI drafts a gentle follow-up nudge |
| Deal Closed | Set manually by you when a deal is won |
💡Note: Deal Closed is not set by the AI; you update this manually in the Stage dropdown when a lead converts.
How to Monitor Your Campaign
Once your campaign is live, you can track it from two places:
1. CRM Kanban View: Watch leads move through pipeline stages in real time from New to In Progress to Positive, Negative, or Need for More Info as replies come in.
2. Dashboard: Your Dashboard shows a high-level summary including:
- Total contacts
- Total campaigns
- Successful Deliveries: the percentage of emails successfully delivered to recipients’ mail servers. 100% means all emails sent reached their destination.
- Database size
3. Reports & Logs: Head to Reports & Logs in the left sidebar for a full breakdown of campaign activity: emails sent, replies received, classifications, and more.
💡Tip: Check your campaign within the first hour of launching. Confirm that emails are going out, leads are moving to In Progress, and the SendGrid webhook is reporting delivery status. Catching any issues early saves a lot of trouble later.
Running Multiple Campaigns
You can run multiple campaigns at the same time across different industries, different lead groups, or different phases of outreach.
A few things to keep in mind when running multiple campaigns:
- Each campaign should target a different industry or a different group of leads; avoid overlapping the same leads across campaigns running simultaneously
- Use different templates for different industries; a generic template across multiple sectors will underperform
- Name each campaign clearly so your Reports & Logs stay organised
Most Common Problems & How to Fix Them
Run Campaign button not appearing
Make sure you’ve selected at least one lead by clicking the checkbox on a lead card. The toolbar only appears once a lead is selected.
Emails not sending after campaign launches
Check that SendGrid is connected and the Active checkbox is ticked in Email Integrations. Also confirm your API key is saved; a wrong key will silently prevent sending.
Leads not moving to In Progress
This usually means the campaign didn’t launch correctly. Check the campaign confirmation message and look in Reports & Logs to confirm the campaign shows as active.
AI replies not appearing
Confirm your IMAP is set up correctly and your Gmail App Password is still valid. If IMAP isn’t pulling in replies, the AI has nothing to classify and respond to.
Wrong template used in campaign
You can’t change the template mid-campaign for emails already queued. For future sends, always review the template in the confirmation step before clicking Done.
Emails landing in spam
You’re likely using Single Sender in SendGrid. Switch to Domain Authentication; see Guide 2 for full instructions. This is the most effective fix for deliverability issues.
Frequently Asked Questions (FAQs)
Can I add more leads to a campaign after it has started?
Contact support@leadvix.com for the most up-to-date answer on this campaign editing capabilities may evolve as the platform develops.
What happens if a lead’s email address is wrong?
The email will bounce. SendGrid will report this back to LeadVix through the webhook; you’ll see it in your campaign data as a bounced email. Update the lead’s email address in the CRM and consider re-running the campaign for that lead separately.
What if two leads from the same company are in my campaign?
Both will receive the email separately since LeadVix treats each lead record individually. If you want to avoid this, check your lead data before running and remove duplicate company contacts manually.
How many leads can I include in one campaign?
This depends on your subscription plan’s limits and your SendGrid daily sending limit. Check both before running a large campaign to avoid hitting a cap mid-send.
Can I run campaigns for multiple industries at the same time?
Yes, you can run separate campaigns for different industries simultaneously. Just make sure each campaign has its own industry-specific template and that leads aren’t overlapping across campaigns.