Understanding how LeadVix reads, classifies, and responds to your leads automatically
What Is This Guide For?
Once your campaign is running and leads start replying, the AI Email Assistant helps you manage those replies efficiently. This guide explains exactly how it works, where to find it, how to use it, and what each part does.
Where Is the AI Email Assistant?
The AI Email Assistant lives inside each lead’s profile under the E-mail tab in the left sidebar.
To access it:
- Go to CRM
- Click on any lead to open their profile
- Click the E-mail tab in the left sidebar
What’s Inside the E-mail Tab
The E-mail tab has two main areas:
1. Send Message Panel (top)
This is where you compose and send emails to the lead:
| Element | What It Does |
| To | Pre-filled with the lead’s email address |
| Template | Select Template dropdown — opens a gallery of your saved templates |
| Subject | Enter your email subject line |
| Email Body | Rich text editor with full formatting toolbar |
| Upload File | Attach a file to your email |
| Attachments Library | Access previously saved attachments |
| Send / Cancel | Send the email or discard |
2. Email Timeline (below)
Scrolling down shows the full conversation history with this lead: every email sent, its subject line, body, timestamp, and sent status.
How to Select a Template
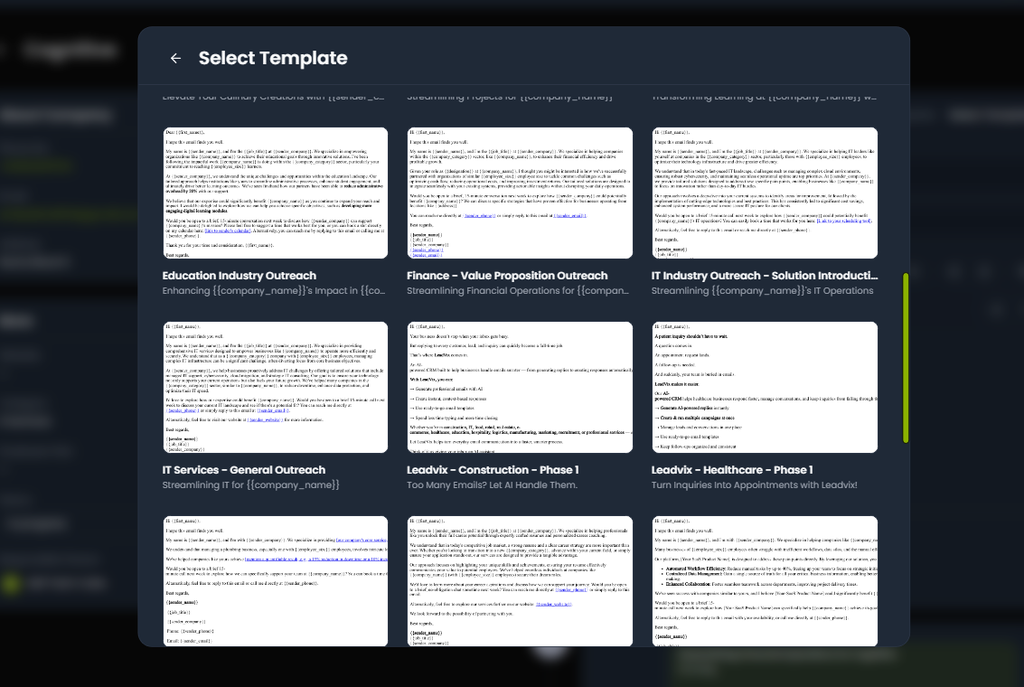
When composing a reply, click Select Template in the top right of the Send Message panel. A gallery popup appears showing all your saved templates, each displayed as a card with:\
- Template name (e.g. “IT Services — General Outreach”)
- Subject line preview
- Email body preview
Click any template to load it into the compose area. You can then edit it before sending.
💡Tip: Always have industry-specific templates saved before your campaigns go live. When a lead replies and needs a response, having the right template ready saves a lot of time.
What the AI Actually Does
When a lead replies to your campaign email, here’s what happens:
- The reply arrives in your Gmail inbox
- LeadVix pulls it in through your IMAP connection
- The AI reads the reply and classifies it by intent
- The lead’s Stage in the CRM updates automatically based on the classification
- Depending on your Auto Send setting, a reply either goes out automatically or waits for you to send manually from the E-mail tab
The 5 Reply Classifications
Every incoming reply gets classified into one of these categories. The lead’s Stage dropdown updates automatically:
1. Positive
Lead replied with interest. Stage updates to Positive.
What to do: Open the E-mail tab, select an appropriate template, personalise it, and send promptly. A positive reply that waits too long loses momentum.
2. Semi Negative
Lead showed hesitation, not a clear yes or no. Stage updates to Semi-negative.
What to do: LeadVix waits the number of hours set in General Settings (default 72 hours) before prompting a follow-up. Review and send from the E-mail tab when ready.
3. Need for More Info
Lead wants more details. Stage updates to Need for more info.
What to do: Open the E-mail tab, select a detailed template or write a specific reply addressing their question. Your Knowledge Base is what the AI uses to inform this response.
4. Negative
Lead is not interested. Stage updates to Negative.
What to do: No follow-up needed. Respect the response and don’t re-add this lead to future campaigns.
5. In Progress (no reply yet)
Lead hasn’t replied. Stage stays as In progress.
What to do: Send a follow-up from the E-mail tab using a follow-up template.
How to Send a Reply
Whether you’re responding to a Positive lead, following up on a Semi Negative, or answering a Need for More Info, the process is the same:
- Open the lead profile in CRM
- Click the E-mail tab
- Click Select Template and choose the most relevant template from the gallery
- Review and personalise the email — check the subject line, edit the body, make sure variables like {{first_name}} and {{company_name}} are correct
- Attach any files if needed using Upload File or Attachments Library
- Click Send
The sent email immediately appears in the conversation timeline below.
⚠️ Important: Always personalise before sending even with a good template. A reply that feels personal gets far better results than one that reads like a mass email.
Auto Send — On or Off?
The Auto Send setting in General Settings is the most important setting controlling how the AI handles replies.
Auto Send ON (Create & Send)
This is the default behaviour when IMAP is connected, and email sending is active. LeadVix:
- Reads the incoming reply
- Classifies it as Positive, Need for More Info, Semi Negative, or Negative
- Updates the lead’s stage in the pipeline automatically
- Sends an appropriate auto-reply using your organisation’s Knowledge Base and saved templates
- Addresses the lead by name if their details are available
All of this happens automatically; no manual action needed. Replies go out fast and consistently, even when you’re not at your desk.
Auto Send OFF
The AI still classifies the reply and updates the stage, but nothing sends automatically. You go to the E-mail tab, select a template, personalise, and send manually. Full control every time.
How to Disable Auto-Replies
Auto-replies are active by default when both IMAP and email sending are connected. There is one recommended option to turn them off:
Turn Off Auto Send (Recommended)
Go to Settings → General Settings and change the Auto Send setting to Create & Hold. This pauses automatic replies while keeping your IMAP and SendGrid connections active. Your campaigns can still run, and replies still come in; you just handle them manually from the E-mail tab.
Viewing the Full Conversation History
Scrolling down in the E-mail tab shows everything that’s happened with this lead:
- Every email sent — subject line, full body, timestamp
- Lead Status History — a complete log of every stage change with timestamps and who or what triggered it (e.g. “New → In progress — Mon 17 Aug, 16:18 — Status changed from New to In progress by Soft Tech Cube”)
- Schedule Meetings section — book a Google Meet or Zoom directly from here
- Things to Do button
- Add a new activity option
Scheduling a Meeting Directly From the E-mail Tab
Once a lead responds positively, you can schedule a call without leaving the lead profile. Scroll down in the E-mail tab to the Schedule Meetings section:
- Choose Google Meet or Zoom
- Set the date and time
- Send the invite
The meeting gets logged in the lead’s timeline automatically.
Common Issues & How to Fix Them
E-mail tab not showing conversation history
Make sure IMAP is configured correctly. If IMAP isn’t pulling in replies, the conversation history will be empty. Go back to Guide 3 and verify your IMAP setup.
Template gallery is empty
You haven’t created any templates yet. Go to Email Templates in the left sidebar and create at least one before trying to send replies. See Guide 7 for full instructions.
Sent email not appearing in timeline
Refresh the lead profile and check again. If it still doesn’t appear, confirm your SendGrid configuration is active and working correctly.
Lead stage not updating after a reply comes in
Check that IMAP is pulling in replies correctly. If LeadVix can’t read the reply, it can’t classify it or update the stage.
Frequently Asked Questions (FAQs)
Where do I go to reply to a lead?
Open the lead profile in CRM, click the E-mail tab in the left sidebar, select a template from the gallery, personalise it, and click Send.
Does the AI automatically send replies?
Only if Auto Send is turned on in General Settings. With Auto Send off, nothing sends without you manually clicking Send in the E-mail tab.
How do I know what a lead replied?
Open their lead profile, click the E-mail tab, and scroll down to the conversation timeline. All sent and received emails are shown there with full body text and timestamps.
What if the AI classifies a lead incorrectly?
Manually update the lead’s Stage using the dropdown in the More section of their profile. Then reply appropriately from the Email tab.