Setting up outbound email so LeadVix can start sending on your behalf
What Is This Guide For?
Before LeadVix can send any outreach emails, follow ups, campaign messages, password resets, or even lead notifications, you need to connect a SendGrid account. This is the first thing you basically set up right after registering.
This guide will take you through everything in order, from creating your SendGrid account, to copying all the information into LeadVix and confirming everything is working.
⚠️ Please Note: SendGrid is a third party service operated independently by Twilio Inc. Not affiliated or owned by LeadVix or any of its affiliates. The prices, plans and policies of SendGrid are independent of your LeadVix subscription and subject to change. LeadVix has no control over SendGrid’s service availability, the deliverability rates, or even any updates to their terms. We suggest reviewing SendGrid’s own terms and pricing on your side, on your own, before you move forward.
Before You Start: Which Option Should You Choose?
SendGrid provides two different ways to verify who you are emailing from. You have to choose one approach and stick with it the whole time, don’t mix steps from both or you might end up getting stuck.
| Option A: Single Sender | Option B: Domain Authentication | |
| Best for | Testing only | All real use |
| Setup time | 5 minutes | 15–30 minutes |
| Email lands in | Often spam | Inbox |
| Requires a domain | No | Yes |
| Recommended | ❌ | ✅ |
💡Simple rule: If you’re just testing whether the connection works, use Option A. For real campaigns, client outreach, and lead emails, always use Option B.
OPTION A: Single Sender Verification
Fastest way to start. Best for testing only.
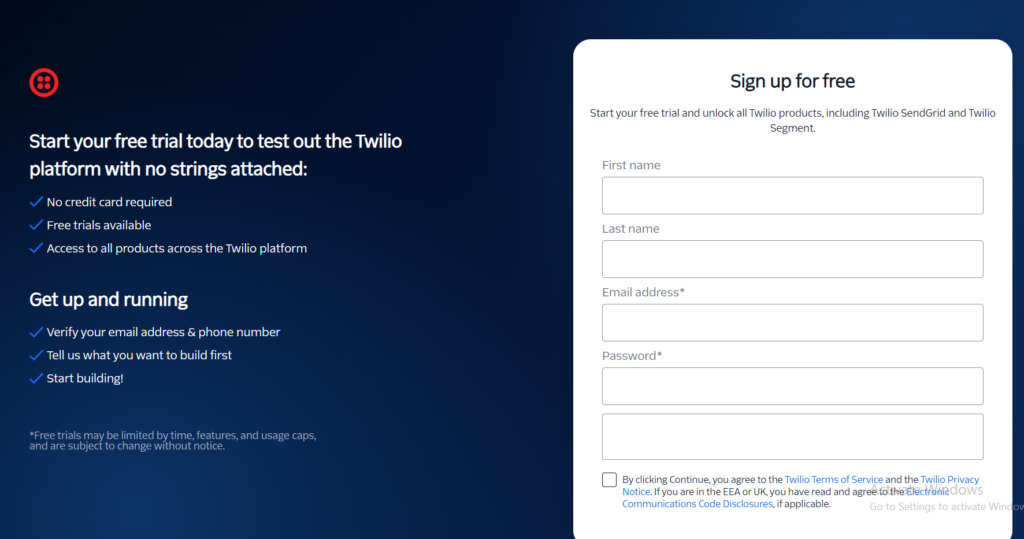
Step 1: Create a Free SendGrid Account
Open your browser and go to sendgrid.com. Click Start For Free.
Fill in the registration form:
- First name and last name
- Business email address
- Password
Just hit Continue and make sure you confirm your email, when SendGrid sends over that verification link.
On the free SendGrid plan you can send up to 100 emails each day, honestly that should be more than enough to check the connection and get rolling.
💡Tip: Sign up using a legit business email address when you’re registering for SendGrid. If you plug in a personal Gmail or Yahoo email, it’s more likely to get tagged by spam filters, and SendGrid might ask you to verify that address first before you’re allowed to send.
Step 2: Verify Your Sender Email Address
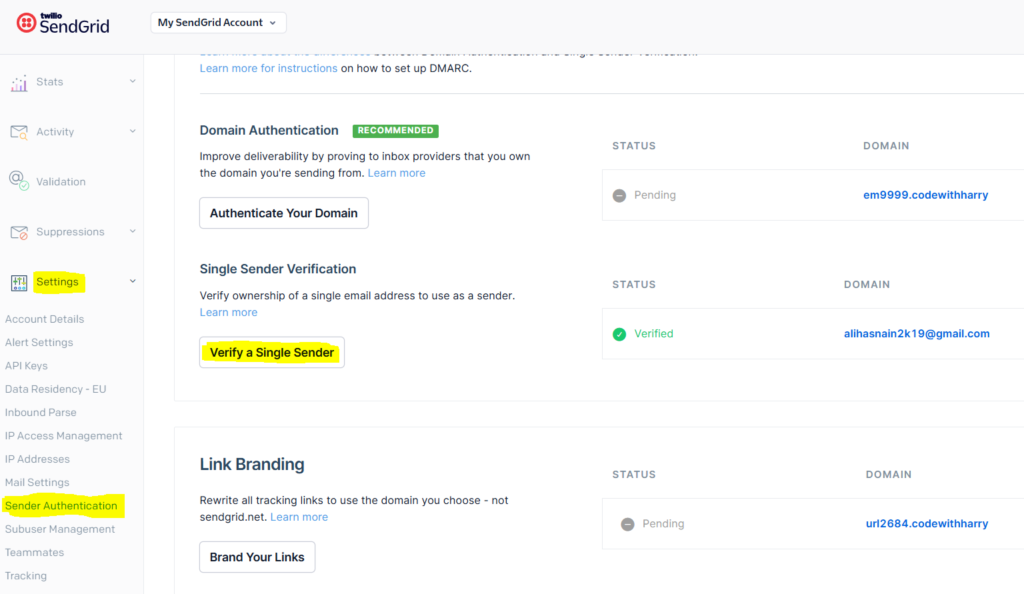
Once inside your SendGrid dashboard:
- Go to Settings in the left sidebar
- Click Sender Authentication
- Click Verify a Single Sender
- Fill in the following details:
- From Name: The name recipients will see in their inbox
- From Email: The email address you want emails sent from (e.g., noreply@yourcompany.com)
- Reply-To Email: Optional, if you want replies to go to a different address
- Click Create
- SendGrid will send a verification link to the From Email address you entered.
- Open that email and click the link to confirm
This verified address becomes your From Email, the one you’ll enter into LeadVix in Step 4.
⚠️ Spam Warning: Emails sent via Single Sender are significantly more likely to land in recipients’ spam or junk folders. This is because SendGrid can only mark them as sent “on behalf of” your address rather than fully authenticated. If email deliverability matters to your business at all, use Option B instead.
❗ Do not skip this step. If your sender address isn’t verified, SendGrid will block all outgoing emails entirely.
Step 3: Create an API Key
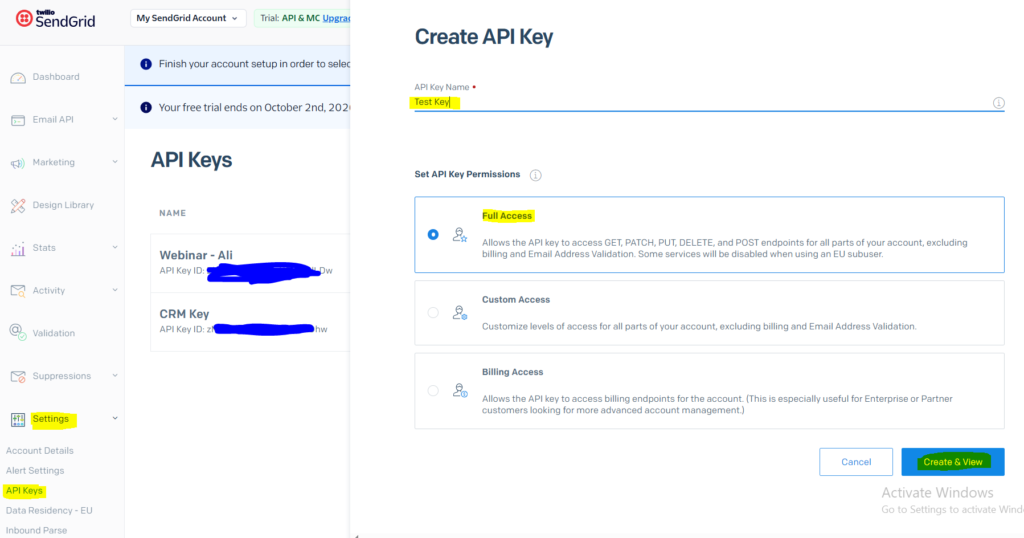
The API key is what allows LeadVix to connect to your SendGrid account and send emails on your behalf.
- Go to Settings → API Keys
- Click Create API Key
- Give it a name; something like “CRM Key” works fine
- Select Full Access under permissions
- Click Create & View
- Copy the long key that appears on screen; it starts with SG.
🔴 Critical: You will only see this API key once. The moment you close or leave this page, it is gone permanently. Copy it immediately and save it somewhere safe, in a password manager or a secure private document. If you lose it, you’ll need to delete it and create a brand new one.
Step 4: Paste Your SendGrid Details Into LeadVix
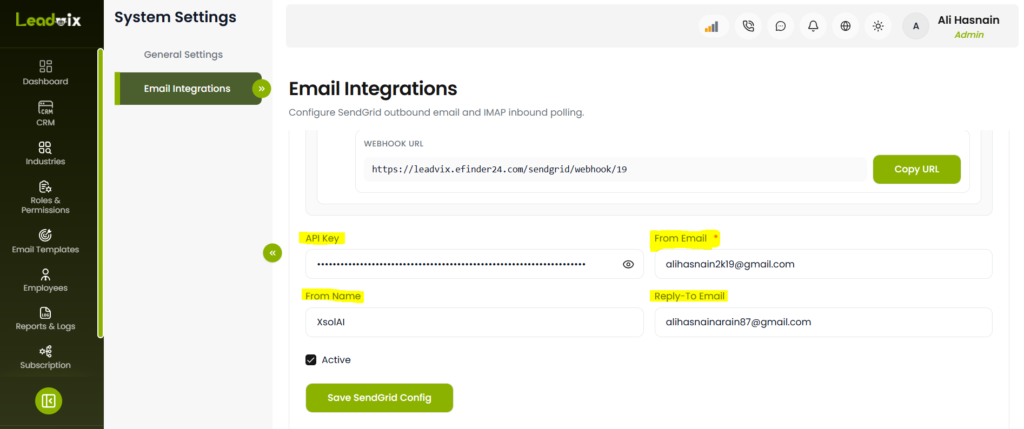
Now open LeadVix and go to Settings → Email Integrations → SendGrid. Fill in the following fields:
| Field | What to Enter |
| API Key | The SG. key you copied in Step 3 |
| From Email | The sender address you verified in Step 2 |
| From Name | The display name recipients see in their inbox |
| Reply-To Email | Optional where replies should be routed |
| Active | Check this box to enable sending |
Once everything is filled in, click Save SendGrid Config.
🔒 Security Note: Your API key is stored encrypted the moment you save it. Nobody, including the LeadVix team, can read it back after it’s been saved. If you ever need to update it, simply paste a new one.
Step 5: Run a Test to Confirm It Works
- Once you’ve saved your SendGrid config, LeadVix gives you the option to run a Test Configuration.
- Click Test Configuration; the system will send a test email to confirm everything is connected properly.
- If it’s successful, you’ll get a message saying SendGrid Test Passed.
- Look in your email inbox, the test email should be there in a minute or 2.
💡 Tip: If you have setup option A (Single Sender) your test e-mail might go into your Spam or Junk folder. This is perfectly normal and is expected as Single Sender emails are not 100% validated. It doesn’t indicate that the setup failed. What is important is the passing of the test.
Step 6: Set Up the SendGrid Webhook for Email Tracking
This step is not required, but it is strongly advised. If it is not connected, LeadVix still can send emails, yet you will never truly see how many of them are opened, tracked, bounced, or clicked. You will never have any open rates, click tracking or bounce alerts.
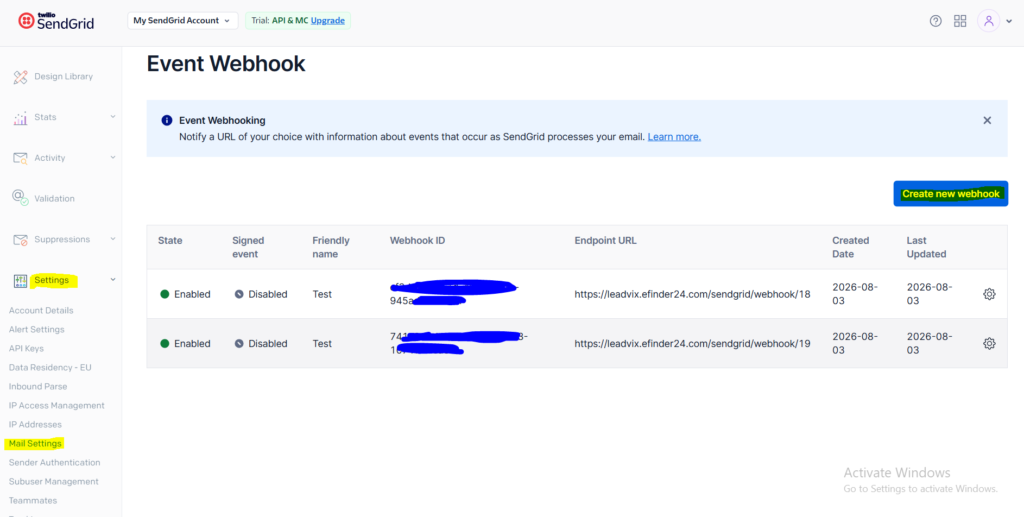
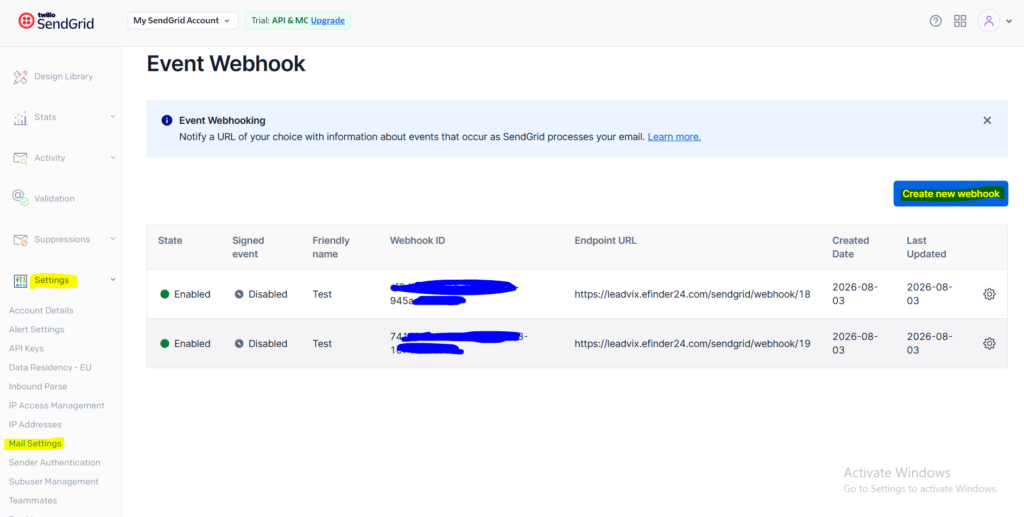
- In SendGrid, go to Settings → Mail Settings → Event Webhook
- Click Create New Webhook
- Give it any name
- Set the HTTP POST URL to:
| https://leadvix.efinder24.com/sendgrid/webhook/19 |
- Enable all the events you want to track:
- ✅ Delivered
- ✅ Opened
- ✅ Clicked
- ✅ Bounced
- ✅ Dropped
- ✅ Spam Reports
- Click Save
💡Tip: The Webhook URL is also available inside LeadVix on the Email Integrations page — you can copy it directly from there instead of typing it manually.
OPTION B: Domain Authentication
Recommended for all real use. Send fully authenticated email from your own domain.
Step 1: Create a Free SendGrid Account
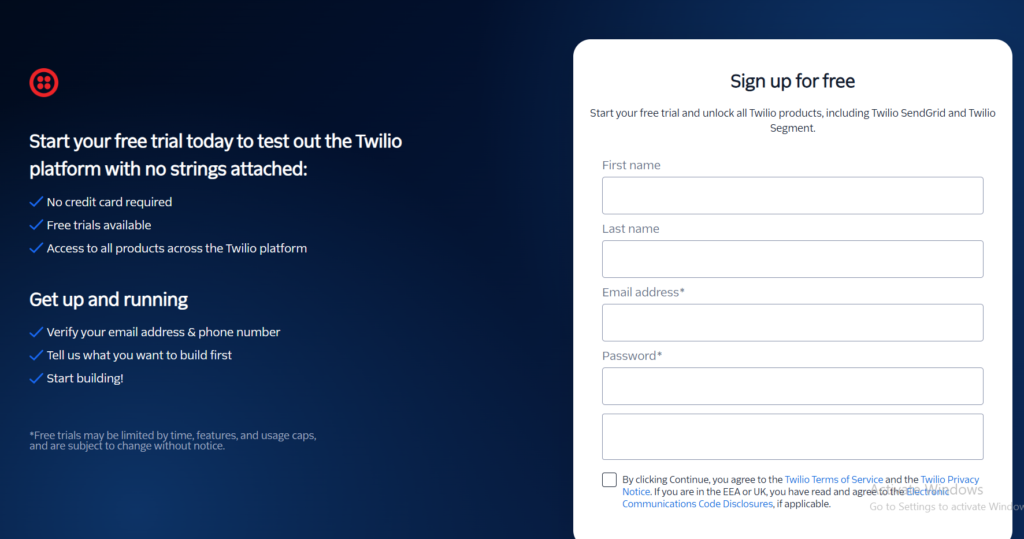
Same as Option A, Step 1: Go to sendgrid.com, tap Start For Free, and sign up using your business email . When the verification link shows up, confirm it right away
💡Tip: Try a genuine business email address. SendGrid might request you to verify it, before anything else.
Step 2: Authenticate Your Domain
This is the crucial part because it helps your messages land in the inbox instead of going to spam. You’ll get 3 DNS entries added to your domain. It can sound a bit intense, but once you follow these steps it gets way easier.
- Go to Settings → Sender Authentication
- Click Authenticate Your Domain
- Choose your DNS or hosting provider from the dropdown options, including GoDaddy, Namecheap, Cloudflare, and Google Domains. If yours isn’t listed, select “Other Host (Not Listed).“
- Enter your domain name (e.g., yourcompany.com)
- Leave “Use automated security” turned ON; this is the recommended setting
- Click Next
- SendGrid will show you 3 CNAME records; each has a Host/Name and a Value
- Open a new tab and log in to wherever you manage your domain’s DNS settings
- Add all 3 CNAME records exactly as shown. Copy the values carefully; even one wrong character will cause verification to fail
- Go back to SendGrid and click Verify
- Once SendGrid finds the records, your domain is authenticated, and you’re good to go.
⏳Heads Up: DNS changes don’t always take effect immediately. They can take anywhere from a few minutes to 48 hours to propagate, honestly. If the Verify fails straight away, don’t panic; wait a few hours. Then try again, before you assume something went wrong entirely.
👥Don’t manage your own domain? If your company domain is handled by an IT team or a web developer, just send them the 3 CNAME records, and ask them to add those records to the DNS. They’ll know what to do.
Step 3: Create an API Key
Same as Option A Step 3:
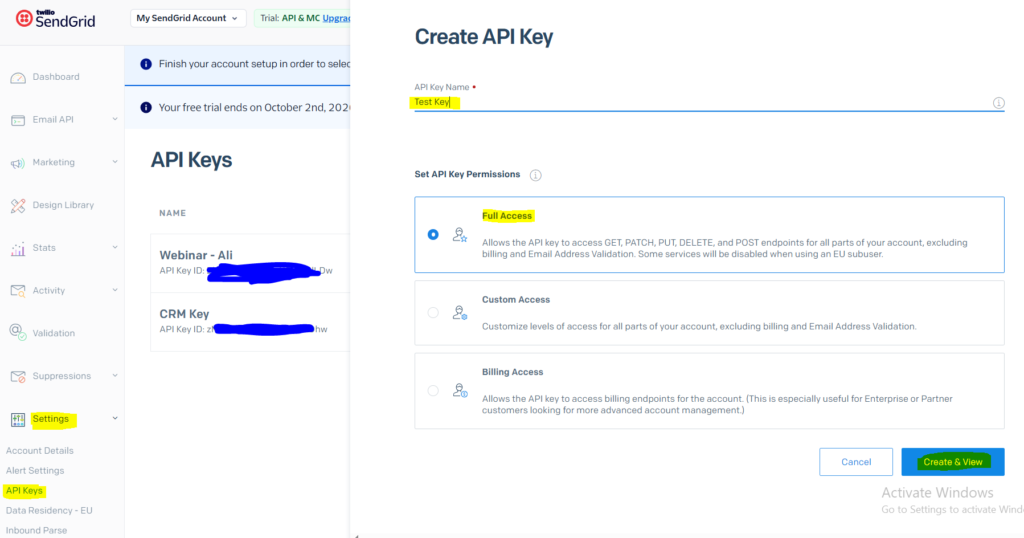
- Go to Settings → API Keys → Create API Key
- Name it “CRM Key“
- Select Full Access
- Click Create & View
- Copy the key immediately; it starts with SG.
🔴 Critical: Save this key the moment you see it. You will only see it once. If lost, delete it and create a new one.
Step 4: Paste Your SendGrid Details Into LeadVix
Go to Settings → Email Integrations → SendGrid in LeadVix and fill in:
| Field | What to Enter |
| API Key | The SG. key from Step 3 |
| From Email | Any email address on the domain you authenticated in Step 2 (e.g. hello@yourcompany.com) |
| From Name | Display name shown in the recipient’s inbox |
| Reply-To Email | Optional where replies should go |
| Active | Check this box to enable sending |
Click Save SendGrid Config.
🔒 Security Note: API key is stored encrypted. Nobody can read it back after saving.
Step 5: Run a Test to Confirm It Works
Same as Option A Step 5: click Test Configuration inside LeadVix. If everything is set up correctly, you’ll see SendGrid Test Passed, and a test email will arrive in your inbox.
With Domain Authentication set up properly, this test email should land directly in your inbox, not spam.
Step 6: Set Up the SendGrid Webhook for Email Tracking
Same as Option A Step 6:
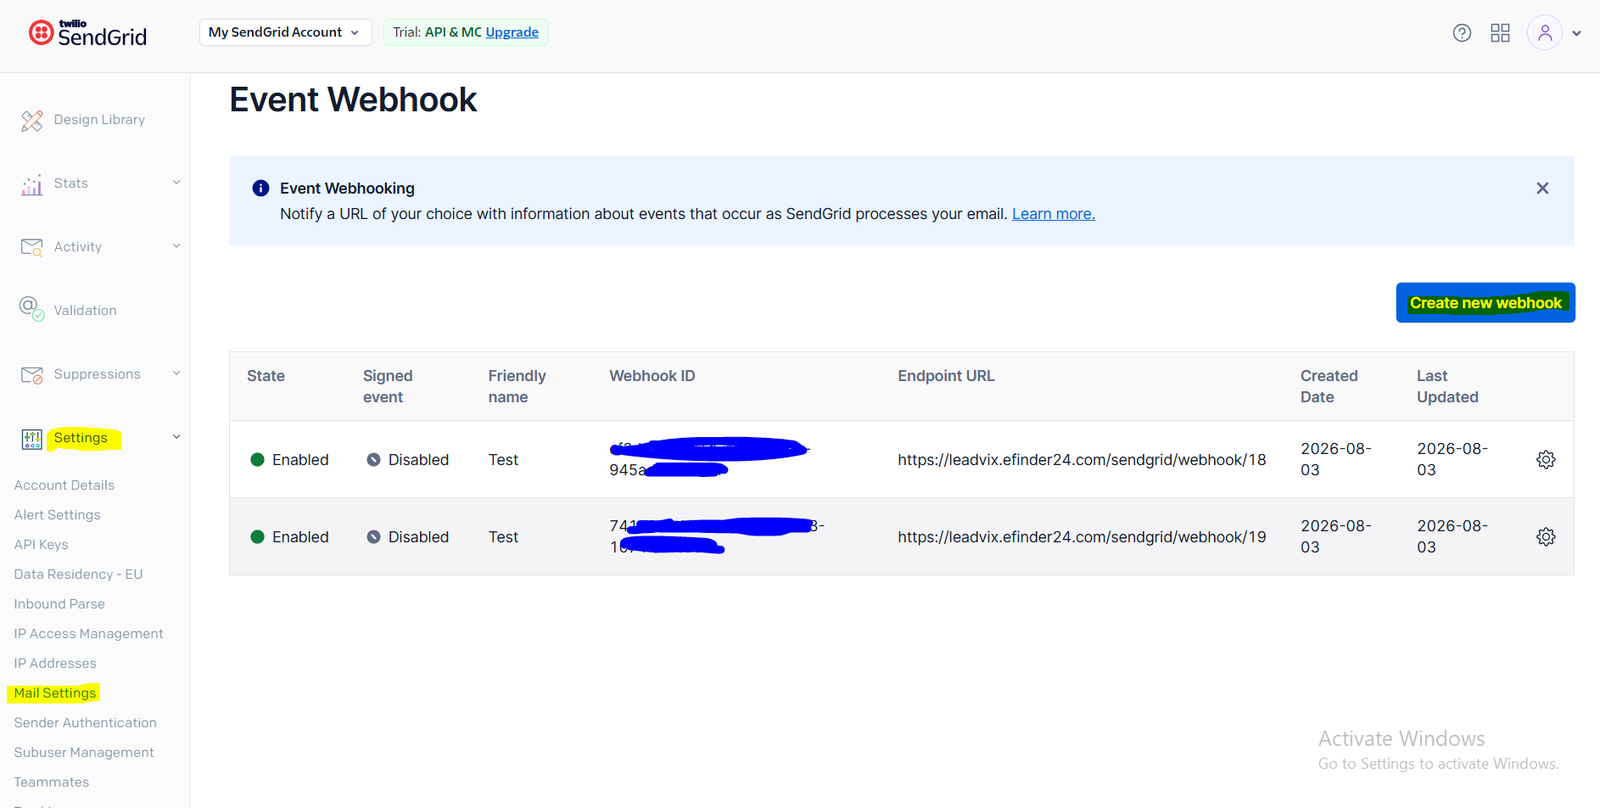
- In SendGrid, go to Settings → Mail Settings → Event Webhook
- Click Create New Webhook
- Set the HTTP POST URL to:
| https://leadvix.efinder24.com/sendgrid/webhook/19 |
- Enable: Delivered, Opened, Clicked, Bounced, Dropped, Spam Reports
- Save
Quick Reference Card
| Field | What to Enter |
| API Key | SG. key from SendGrid stored encrypted |
| From Email | Verified single sender OR any address on authenticated domain |
| From Name | Display name shown in recipient’s inbox |
| Reply-To Email | Optional where replies are routed |
| Active | Must be checked to enable sending |
| Webhook URL | https://leadvix.efinder24.com/sendgrid/webhook/19 |
Troubleshooting
#1. Emails are not sending at all
Please verify that the Active box is checked over on LeadVix’s Email Integrations page. And also confirm that your API key was copied with full accuracy, because even one missing character will make it fail quietly. Go ahead and remove the key inside SendGrid, then generate a fresh new one, and paste that same key back into LeadVix again.
#2. Emails are landing in spam
You have Single Sender (Option A) enabled. Switch to Option B: Domain Authentication. This is the one most effective solution to spam problems and it only needs to be set up once.
#3. Domain Verify button keeps failing
DNS propagation is a time consuming process, up to 48 hours. Make sure all your 3 CNAME records match what you see in SendGrid. Verify will fail if there is any error in the Host or Value field. Fix it and wait before you try again.
#4. No open rates or click data showing in LeadVix
The Event Webhook isn’t set up or isn’t pointing to the right URL. Navigate to SendGrid → Settings → Mail Settings → Event Webhook and verify that the URL is right and all events are checked as true.
#5. Test email not arriving
If you’re using Option A, please review your spam mail first. If it is not in the spam folder, then check in LeadVix and ensure that your API key and From Email are saved properly.
Frequently Asked Questions (FAQs)
Do I need a paid SendGrid account?
No. The free SendGrid plan allows up to 100 emails per day, which is enough to get started and run small campaigns. You can upgrade your SendGrid plan separately if your volume grows, but that’s entirely between you and SendGrid and has nothing to do with your LeadVix subscription.
Can I use my personal Gmail to set up SendGrid?
Yes, for testing. But for real outreach, always use a business email on your own domain with Domain Authentication set up. Gmail-based sending is far more likely to land in spam.
I lost my API key. What should I do?
Go to SendGrid → Settings → API Keys, delete the old one, and create a new one. Then paste the new key into LeadVix and save again.
What does the webhook actually do?
It basically makes a live, real-time thread between SendGrid and LeadVix, so when something happens to your email, like it gets delivered, it is opened , clicked, bounced or even marked as spam, that kind of info will show up right away inside LeadVix reports.
Can I switch from Option A to Option B later?
Yes. You can set up Domain Authentication at any time and update your From Email in LeadVix accordingly. It’s a good idea to switch as soon as you’re done testing.